[OpenCart] how to install vQmod in OpenCart ?
May 16, 2013 10 Comments

Today, I came up here to make some easy pictures to install “vQmod” (Create xml patches for php files without editing the core system source code so called Virtual file modification system) in OpenCart 1.5.5.1
If you don’t know what is vQmod? then please read before we start.

Assume, we have installed a fresh copy of OpenCart 1.5.5.1 in the system
In this tutorial there are more than one way that vQmod can be installed in the opencart system.
Install vQmod in OpenCart manually:
Step-1: For self securitey! Backup or make a duplicate of your existing installed OpenCart files and folders in safe place.
Step-2: Download the latest version of vQMod
Step-3: Extract vqmod-x.x.x-opencart.zip and upload the vqmod folder to root of OpenCart directory.
Step-4: Now, we need to modify two files. One is /index.php and another one is /admin/index.php file
Search,
//File: /index.php
// Startup
require_once(DIR_SYSTEM . 'startup.php');

// Application Classes
require_once(DIR_SYSTEM . 'library/customer.php');
require_once(DIR_SYSTEM . 'library/currency.php');
require_once(DIR_SYSTEM . 'library/tax.php');
require_once(DIR_SYSTEM . 'library/weight.php');
require_once(DIR_SYSTEM . 'library/length.php');
require_once(DIR_SYSTEM . 'library/cart.php');
require_once(DIR_SYSTEM . 'library/affiliate.php');
Replace with,
// vQmod
require_once('./vqmod/vqmod.php');
VQMod::bootup();

// VQMODDED Startup
require_once(VQMod::modCheck(DIR_SYSTEM . 'startup.php'));

// Application Classes
require_once(VQMod::modCheck(DIR_SYSTEM . 'library/customer.php'));
require_once(VQMod::modCheck(DIR_SYSTEM . 'library/currency.php'));
require_once(VQMod::modCheck(DIR_SYSTEM . 'library/tax.php'));
require_once(VQMod::modCheck(DIR_SYSTEM . 'library/weight.php'));
require_once(VQMod::modCheck(DIR_SYSTEM . 'library/length.php'));
require_once(VQMod::modCheck(DIR_SYSTEM . 'library/cart.php'));
require_once(VQMod::modCheck(DIR_SYSTEM . 'library/affiliate.php'));
and,
Search,
//File: /admin/index.php
// Startup
require_once(DIR_SYSTEM . 'startup.php');

// Application Classes
require_once(DIR_SYSTEM . 'library/currency.php');
require_once(DIR_SYSTEM . 'library/user.php'));
require_once(DIR_SYSTEM . 'library/weight.php');
require_once(DIR_SYSTEM . 'library/length.php');
Replace with,
// vQmod
require_once('../vqmod/vqmod.php');
VQMod::bootup();

// VQMODDED Startup
require_once(VQMod::modCheck(DIR_SYSTEM . 'startup.php'));

// Application Classes
require_once(VQMod::modCheck(DIR_SYSTEM . 'library/currency.php'));
require_once(VQMod::modCheck(DIR_SYSTEM . 'library/user.php'));
require_once(VQMod::modCheck(DIR_SYSTEM . 'library/weight.php'));
require_once(VQMod::modCheck(DIR_SYSTEM . 'library/length.php'));
Step-5: vQmod is now ready to use. Upload desired xml script to ‘vqmod/xml’ folder
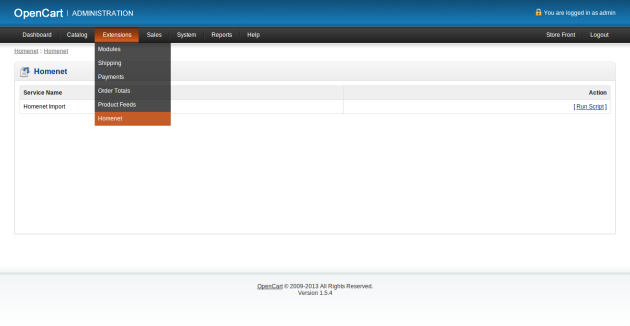
Step-6: How this .xml file should look? For exampale we need to add a menu item “Homenet” under “Extension” menu in the admin panel. So we need to create a file named admin_menu_modification.xml in ‘vqmod/xml’ folder like;
‘vqmod/xml/admin_menu_modification.xml’
<!--
#author: Tanveer Noman
#file name: admin_menu_modification.xml
#description: This file is demonstrating how to write a simple xml file to add new
menu item named "Homenet" in admin menu section
-->
<modification>
	<id>Admin Menu Modification</id>
	<version>1.5.x</version>
	<vqmver>2.2.1</vqmver>
	<author>tanveer.noman@gmail.com</author>
	<file name="admin/controller/common/header.php">
		<operation>
			<search position="after"><![CDATA[$this->data['text_feed'] = $this->language->get('text_feed');]]></search>
			<add><![CDATA[$this->data['text_homenet'] = $this->language->get('text_homenet');]]></add>
		</operation>
		<operation>
			<search position="after"><![CDATA[$this->data['feed'] = $this->url->link('extension/feed', 'token=' . $this->session->data['token'], 'SSL');]]></search>
			<add><![CDATA[$this->data['homenet'] = $this->url->link('homenet/homenet', 'token=' . $this->session->data['token'], 'SSL');]]></add>
		</operation>
	</file>
	<file name="admin/view/template/common/header.tpl">
		<operation>
			<search position="after"><![CDATA[<li><a href="<?php echo $feed; ?>"><?php echo $text_feed; ?></a></li>]]></search>
			<add><![CDATA[<li><a href="<?php echo $homenet; ?>"><?php echo $text_homenet; ?></a></li>]]></add>
		</operation>
	</file>
	<file name="admin/language/english/common/header.php">
		<operation>
			<search position="after"><![CDATA[$_['text_feed']                        = 'Product Feeds';]]></search>
			<add><![CDATA[$_['text_homenet']                     = 'Homenet';]]></add>
		</operation>
	</file>
</modification>
Wallah! You are done!
Step-7: Now log in to admin panel. Mouse over to “Extension” menu item, if everything works good then you can see a new menu item “Homenet” is added whithout changing any core system files.
Install vQmod in OpenCart using Autoinstaller:
Step-1: Download the latest version of vQMod and extract it.
Step-2: Use your FTP to upload the folder “vqmod” to your opencart store. Make sure vqmod/vqcache folders are writable (either 755 or 777).
Step-3: Now browse http://www.your-domain.com/vqmod/install
Step-4: If everything goes well, you should get a success message. If not then check permissions.
***Troubleshooting***
– Make sure you are giving the currect vqmod path like; require_once(‘../vqmod/vqmod.php’);
– Check if the vqmod folder and the vqmod/vqcache folders are writable (755)
– Verify that there are new “vq2” files in the “vqmod/vqcache” folder after loading your store homepage
– Some times you may need to create “mods.cache” file inside “vqmod” folder and make it writable (755)
– You may need to create logs” folder inside “vqmod” folder and make it writable (755)
For more information:
http://docs.opencart.com/display/opencart/OpenCart+1.5+Home
http://www.opencart.com/index.php?route=extension/extension
http://forum.opencart.com
https://github.com/opencart/opencart/issues
http://opencart.hostjars.com
http://opencart-help.com
Related Links:
[Video] http://code.google.com/p/vqmod/wiki/Install_OpenCart
That’s all!
You can inbox me or drop your comments/feedbak here I will reply on that regards.
Thanks for reading and don’t forget to share!


